
Behind The Piece: Figured Walnut Storage Bench
Learn about how his beautiful figured walnut storage bench with upper splines came to be, including all the details on its design and construction.
The Design
This piece started, like most pieces, by talking with the client, and learning about their needs and goals for the piece. In this case, the client was looking for a bench for the foot of their bed and couldn’t find anything they really loved available commercially. They were able to send me some links to some pieces which they liked in part, and this always turns out to be a helpful way to get the design conversation started.
Once we got into the design conversation we quickly narrowed on a couple of different concepts for this piece. In one concept, the bench would have a fixed top and three large drawers on the front, and the other concept called for a top opening storage bench. In both cases, a simple, mid-century inspired X shaped base was featured. After talking through the tradeoffs, we settled on the top opening bench, with a lip designed to accommodate a cushion which the clients would provide.

The challenge now was how to take a relatively simple design and make it something elegant and memorable. To that end, there were a couple of key elements I wanted to incorporate into the design to really bring it up a notch. The first was to add some splines to the corners to both structurally reinforce the miter joints there as well as add a little bit of visual interest. Together with the client we looked at designs both for uniform splines as well as the design that we settled on which is spines of different lengths arranged on a curve across the corners of the piece. We also needed to decide on a material for the splines, and I ended up producing a few different renderings using fusion 360 showing different material options for the splines. I had recently seen some pictures online of some walnut pieces featuring copper inlays, so I decided to include copper as one of the spine options.
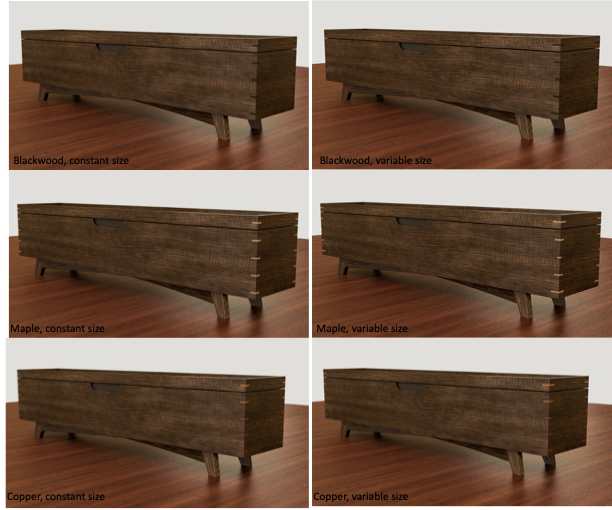
From the renderings it was clear that copper was one of the materials the client was interested in, so I went ahead and made a prototype that showed a few different spline materials for the corners including maple, wenge, and copper. This prototype was extremely helpful in finalizing the decision with the client.

The final element of the design was finding the right piece of wood to feature. I knew with such a simple design that the wood itself would be the star so we wanted to find something elegant where I could wrap the grain around the piece potentially doing a bookmatch to make up the panel. The goal was to create something which showed level of craftsmanship that you weren't going to be able to find with a commercial piece of furniture. As luck would have it, I was traveling down to Oregon to pick up a slab for another project and found myself at Goby walnut. Gobi is kind of an amazing place if you're into walnut, they have of course a great selection of large walnut slabs, but they also have the best selection of figured walnut I've ever seen and I was able to find a couple of pieces of eight quarter figured walnut that I knew would be perfect for this project.


The Build
The case
Walnut is a beautiful species to work with, but it is also a little high maintenance when it comes to material prep – there are almost always some knots and cracks to fill or address when preparing a board. In this case, there was also a bullet embedded in the material which I had to remove.


To get the effect that I wanted with the grain, I needed to resaw the 8/4 walnut and glue it into a panel which would be long enough to wrap around the front 3 sides of the piece, and wide enough to cover the whole face of the piece. I used a second piece of 8/4 walnut for the back side of the case.

The case itself was fairly straightforward to assemble – it’s just a large mitered box with ¾” walnut plywood set into a groove on the top and bottom. I pre-sanded the interior surfaces before gluing it up since I knew access would be difficult later.
The Copper Splines
This was my first time working with copper, and based on how it went, it may well be my last.
My oldest son is part of an FRC Robotics team, as when volunteering with the team I learned a bit about using the CNC machine to cut aluminum. This experience led me to turn to the CNC machine to cut out the copper splines. It … did not go well. The copper chips kept welding themselves back to the material, making the cuts a big mess, and causing me to break a couple of bits.


Plan B was to build a little sled for the bandsaw and (potentially) sacrifice a blade to the cause. This worked really well with nice clean cuts. The only real problem was that the copper was an excellent heat sync, and the small offcuts got really warm (important safety tip – don’t grab the hot copper with your bare fingertips).

I knocked together a small jig for my palm router to use to cut the splines on the corners of the case which worked really well.
Installing the splines didn’t go as smoothly as I wanted – the slots for them were exactly ¼ of an inch, and the copper bar was also exactly ¼ of an inch thick. I didn’t realize until after I started epoxying the splines into place that those tolerances were too tight, and that the sharp edges of the copper splines would shave material off of the sides of the slots which would then get stuck, and prevent the splines from seating properly. It worked out in the end, but it was a bit of a mess in the middle.
I cut the splines slightly oversized, and ended up using a trim router with a flush trim bit to cut them even with the case sides. This worked pretty well, but I’m pretty sure I will be finding copper shavings in various nooks and crannies of my shop for years to come. Finally, I sanded the corners of the case fairly aggressively to clean up the remaining epoxy residue and get everything nice and even.


The Base
I used a knocked together sled on the table saw to cut the tapered feet for the base, and a different sled to establish the sides of the half-lap joint which joined the 2 legs of the base together. I cut the half-lap before cutting the curve across the bottom of the beams.
One caution with this type of base, the steep angle of the half-lap leaves you with a very thin and fragile edge on one side of the joint, which makes it tricky to get a clean seam. It wasn’t a big deal on this piece (you literally need to be lying on the ground to see it), but would be more noticeable on a taller base.
Final assembly
Once the case was together and the splines installed, I cut the lid off using a track saw. I then installed an extra piece of walnut along the back of the lid to receive the torsion hinges I used. I also installed a thin maple liner on each of the long sides of the interior with dados cut in them allowing the client to re-position the dividers as their storage needs evolve over time.
The base is attached to the case with some screws through the ends of the beams. The holes in the base were slightly oversized, but I’m honestly not very worried about wood movement given the direction of the grain in the base.
The original design called for a ½” deep finger recess for opening the top, but after cutting a template for that I decided to lay the template on the piece at an angle, allowing the opening to fade in from the bottom to the top.


Finally, I added a small tray which can be used to store small items on the interior of the box. The tray is made from figured maple and walnut, and rests on top of the maple liner on the inside of the case.
The Finish
I used rubio monocoat pure as the finish on the walnut, and osmo on the maple components. I added an extra coat of wax to the exterior of the case to get the sheen I wanted, as well as to help protect the copper from pre-maturely oxidizing.

this is not the finish - this is me using some water to lift the grain before the final sanding.


